![OmniByte - PNG Black Logo Oct 2021 (1).png]](https://help.omnibyte.com/hs-fs/hubfs/OmniByte%20-%20PNG%20Black%20Logo%20Oct%202021%20(1).png?height=50&name=OmniByte%20-%20PNG%20Black%20Logo%20Oct%202021%20(1).png)
Once the API configuration is complete, the Forms tab is available. Be sure the forms you intend to use in the integration are set up and published in FormsPro. The Forms tab is used to select the forms you want to use as part of TechPro and to map the TechPro fields to a field in the form so that the form uses the entries automatically from TechPro.
- From the menu on the left, click App Settings, then Forms.
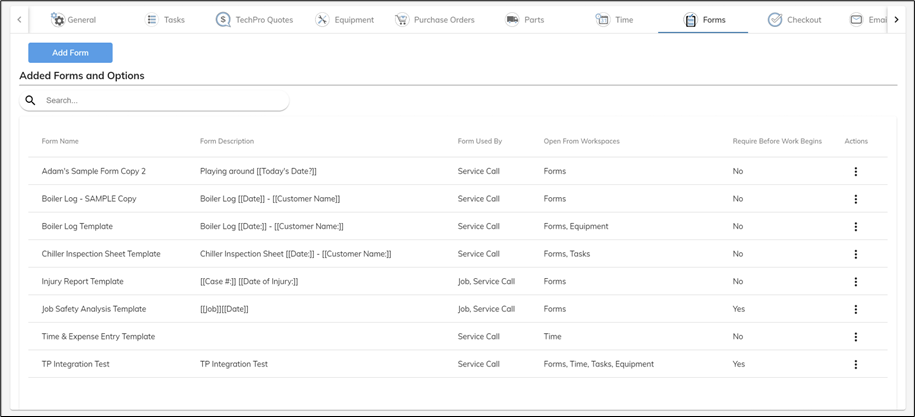
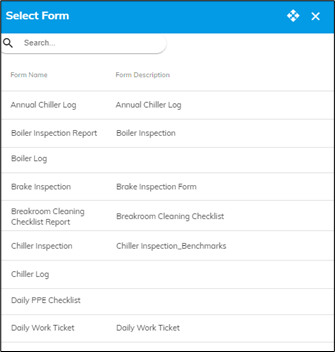
- Click Add Form to open the Select Form window and select a form to add to the list. Only forms that are published appear in the list.
- Select a form you want to use in TechPro to open the Form Options window.
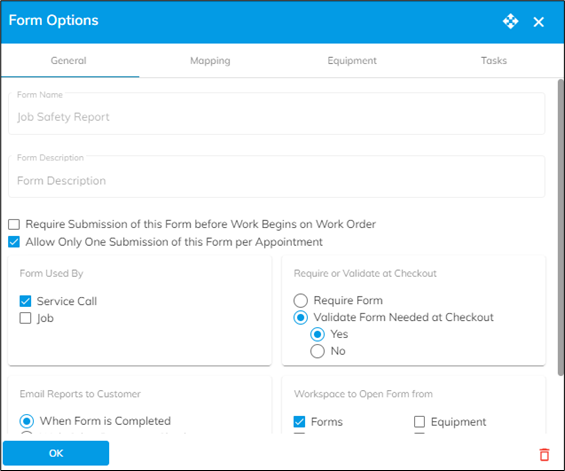
- Select Require Submission of this Form Before Work Begins on Work Order option to specify how the workspaces after the Form icon are handled.
Mark the Lock Workspaces following the Forms Workspace option to require a form submission before work can begin. This can be used to ensure a safety form is completed before the workspaces can be used on the app. See the section about workspace order for information about locking workspaces prior to submitting a form.
Mark the Allow Viewing Workspaces as Read-Only following the Forms Workspace option to allow a tech to view a workspace to the right of the Forms workspace in read-only format thus getting information needed without having to enter work order information.
Select Allow Only One Submission of this Form per Appointment option to prevent additional forms from being started if one has been submitted.
- Select how the form will be used in TechPro – on service calls, on jobs, or both. This determines whether the Forms workspace will display the form according to the work order type, along with the role assigned to the form and user. For example, you have a form for tracking refrigerant which is only used on commercial service calls. Your roles in FormsPro are Commercial and Residential. The refrigerant form will only appear in the Forms workspace for users assigned to the Commercial role, and only on Service Call type work orders.
- The Require or Validate at Checkout section determines when a form is required or if the technician needs to mark the Form Not Needed checkbox at checkout.
Require Form option verifies if a form is required. When this option is marked, if the form appears on the appointment, it is required.
- Tasks forms: When the form only applies to specific tasks, the form becomes required when the task is marked complete.
- Equipment Type forms: The form is required by the tech who adds the equipment to the call unless the equipment was added from the back office. Then, the user who completes a task for the equipment is also required to complete the form.
Select Validate Form Needed at Checkout if the technician needs to specify if the form is needed at checkout. After selecting this option, mark Yes to display the form in the Forms section of the Checkout workspace. The form will need to be completed, or mark the Form Not Needed option on the device. Mark No and the form does not appear with the other forms not needed in the Forms section of the Checkout workspace and it does not need to be completed. This is useful for optional forms or forms such as injury reports that you want handy, but technicians don’t complete on every work order.
Note: If a user does complete the form, it appears with the Submitted forms in the Forms section of the Checkout workspace. - Specify how you want to email reports to a customer. Select When Form is Completed to email reports to a customer once a form is completed and submitted, but before checkout. This can be useful when sending out a safety report. Remind your app users to mark the customer email address in the Email section of the form to be sure the reports are sent. Select With Other Reports at Checkout to email reports to a customer at checkout. Select complete to never send the report that is associated with the form with the email to the customer at checkout. This is useful if you have an internal form that’s part of the work order process but isn’t appropriate for sending to customers.
When the work order is complete, the email sent to the customer will include the work order summary and any form reports that are not marked to exclude. The technician will continue to receive the form reports, any marked Never are excluded only from the customer email.
- Select the workspace(s) to which you want to add the form, so the form is accessible from different workspaces. You can add the form to the Forms, Time, Tasks, Equipment, Purchase Orders and/or Parts workspaces. If you don’t assign a workspace to the form and the form is associated to a task or equipment type it can be opened only from that task or equipment type when on the call. See step 6 about requiring these forms.
If you no longer use a form with TechPro, you can delete it from the Form Options page by clicking the Delete icon in the lower right-hand corner. Deleting a form from this page does not affect the form in FormsPro in any way.
- See Using the Mapping Tab, Using the Equipment Tab and Using the Tasks Tab for more information about the additional tabs in the Form Options window.