![OmniByte - PNG Black Logo Oct 2021 (1).png]](https://help.omnibyte.com/hs-fs/hubfs/OmniByte%20-%20PNG%20Black%20Logo%20Oct%202021%20(1).png?height=50&name=OmniByte%20-%20PNG%20Black%20Logo%20Oct%202021%20(1).png)
Use the Email Configuration page to connect and configure your email service using SendGrid. This integration enables the application to send system notifications, automated messages, and other email communications reliably and securely.
Because email configuration involves account credentials, domain settings, and security considerations, it is strongly recommended that this setup be performed by your organization's IT department or system administrator. Proper configuration helps ensure secure email delivery, protects sensitive information, and maintains compliance with your organization's email and security policies.
SendGrid is a cloud-based email delivery platform designed to help organizations send and manage email communications at scale. It provides the infrastructure needed to deliver emails efficiently while offering visibility into email performance and delivery status.
Key SendGrid capabilities include:
- Reliable email delivery for both transactional and automated messages.
- Scalable sending capacity to support large volumes of email communications.
- Delivery monitoring and analytics, including email delivery, bounce, and engagement tracking.
- Performance management tools to help maintain sender reputation and optimize email deliverability.
- Secure authentication and domain management to improve trust and reduce the likelihood of emails being marked as spam.
Before configuring email settings, ensure that you have the necessary SendGrid account information, API credentials, and any required domain authentication records provided by your IT team or email administrator.
- From the Configuration menu, click Email to open the Email Configuration page.
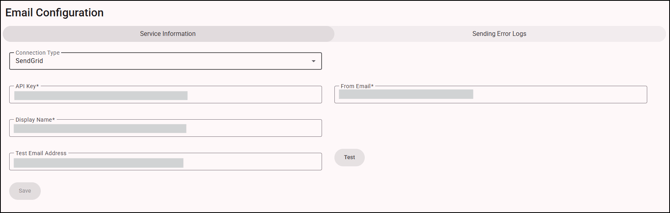
- Select SendGrid from the Connection Type drop down list.
- In the API Key field, enter a secure, unique key (from SendGrid) that authorizes your form application to send emails through your SendGrid account. This is like a password that allows access to your SendGrid email-sending service. For more information, see API Keys. Then enter the email address that appears in the From field in the email header for any emails sent from the mobile app, along with a display name. This must be authorized in your SendGrid account.
- In the Test Email Address field, enter a valid email address where you can receive a test message. Using your own email address is recommended so you can quickly verify that email delivery is functioning correctly.
- Click Test to send a test email using the configuration settings you entered. If the email is received successfully, the SendGrid settings have been configured correctly. If the test fails, review the credentials and settings before trying again.
-
On the Sending Error Logs tab, click + (Add) to define who should be notified when errors or failures occur within the system. For more details, see Using the Email Configuration Page.
- Click Save to store the configuration settings. Once saved, the application will use these SendGrid settings to send all outgoing emails.