![OmniByte - PNG Black Logo Oct 2021 (1).png]](https://help.omnibyte.com/hs-fs/hubfs/OmniByte%20-%20PNG%20Black%20Logo%20Oct%202021%20(1).png?height=50&name=OmniByte%20-%20PNG%20Black%20Logo%20Oct%202021%20(1).png)
Once all the work on the appointment is completed, you can use the Checkout workspace to complete the appointment. This workspace has different sections and fields available depending on different settings and how the Checkout Field Designer is configured. For example, billing and payment information is shown only if you are using TechPro Quotes.

- Expand the Forms section to view the forms assigned to this work order along with their form status.
Note: If you are not using a FormsPro integrated version of TechPro, or the Forms workspace is hidden skip to step 3.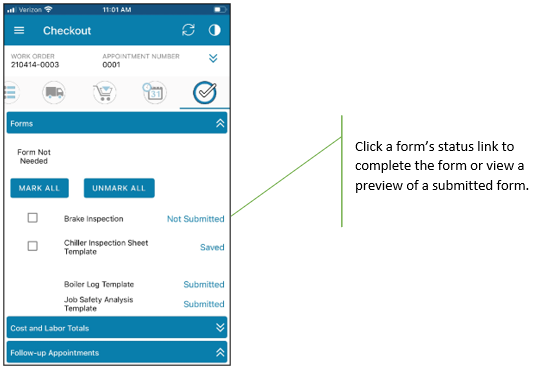
- If any of the forms are not needed for this work order, mark the Form Not Needed box next to the form. If none of the forms are needed for this work order, click the Mark All button to mark every form. This allows you to check out without submitting the form. Forms that have not yet been submitted can be completed by clicking the status link and completing the form according to your company procedures. A report preview of any submitted forms can be viewed by clicking the Submitted status.
- Expand the Costs and Labor Totals section to view the parts and labor costs for the work order. The fields displayed in this section may differ depending on how the Checkout Field Designer has been configured.
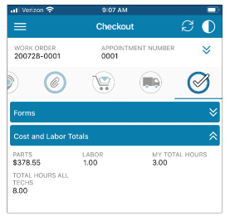
Note: The My Total Hours and Total Hours All Techs fields may not display accurately until the appointment is checked out. - Expand the Follow-up Appointments section to manage any follow-up appointments.
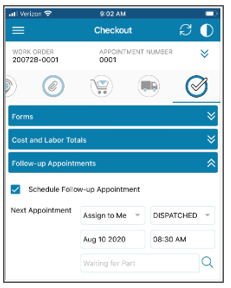
If you have no more work to complete on this appointment, leave the Schedule Follow-Up Appointment option unmarked.
If you have additional work and you are responsible for scheduling a follow up appointment, mark Schedule Follow-Up Appointment. Then, select whether you want the follow up appointment to be assigned to you, or choose Leave Unassigned if the dispatchers should assign it to another technician. Enter or accept the default status, then select a date and enter or select the default time for the follow up. Enter an appointment description or select a predefined description. If you choose Other, you may be required to enter information in another field.
- Expand the Verifications The options displayed in this section appear if TechPro was set up on the Checkout tab of the App Settings page to warn you if no entries were made in those workspaces.
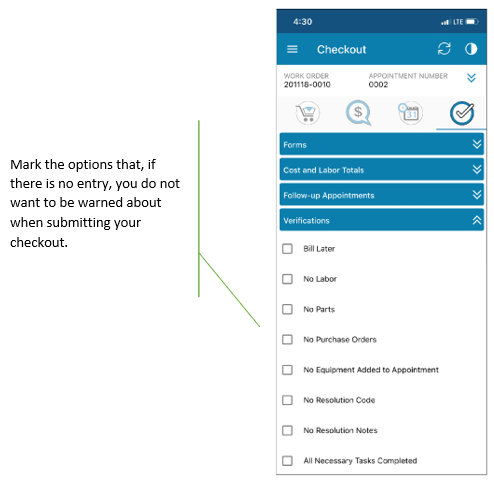
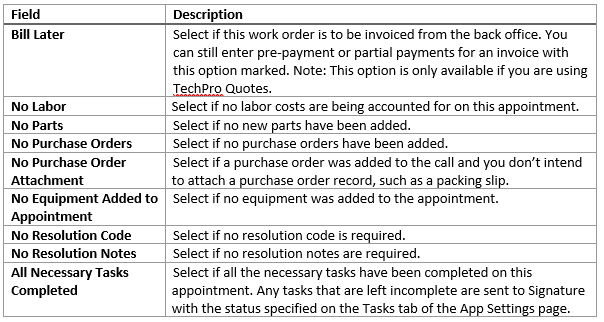
Depending on whether you need to collect payment for this appointment, you can continue with the next steps, or skip the steps that aren’t required by your organization. When you click Submit, this information is sent to the back office. The next time you sync, this new appointment appears in your Appointments list.
- Expand the Resolution section.
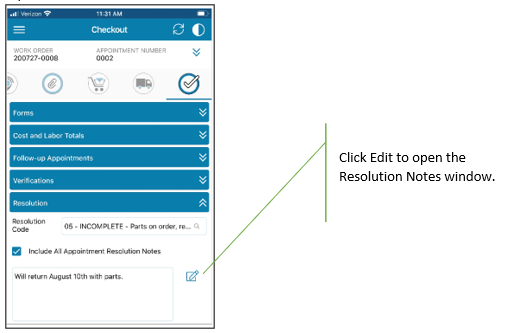
Select a resolution code if your organization utilizes that information. The code entered on a previous appointment for the same call will appear but can be changed by selecting a different one from the list. - Select the Include All Appointment Resolution Notes option to display all resolution notes for this work order in addition to only those for the appointment. Enter a resolution note for this appointment by typing in the box or clicking the Edit button to open a window for more room to write your note. Be as descriptive as possible but remember that whatever you enter here will appear on the Work Order Summary report, which may be sent to the customer.
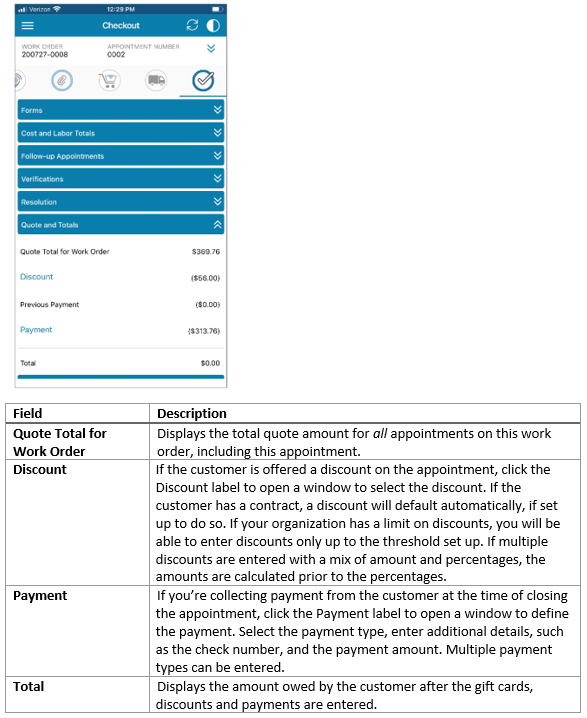
- Expand the Quote and Totals section to enter payment information (if needed and using TechPro Quotes).
- Expand the Signatures section if your organization requires a signature.
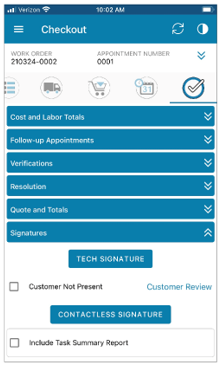
Click Tech Signature to sign your name in the Signature box.
If the customer is not present and you’re ready to compete the appointment, mark the Customer Not Present box.
If the customer is present, click Customer Review to open the Customer Review window.

The customer can review the charges, enter an email address, and sign the agreement. Once the customer has signed, they can click Accept or you can do so. Another window will appear with a thank you message which will prevent the customer from viewing internal information.
To close the Thank You screen, click and hold on the screen for a few seconds. The screen will return to the Checkout workspace.
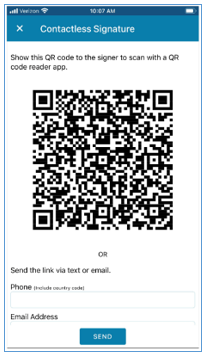
Click Contactless Signature to open the Contactless Signature page. Contactless signatures provide a safe way to receive a signature from customers without having to touch a tablet or smartphone. A contactless signature is completed one of two ways: by providing a QR code for a signer to scan or by sending a link to a signer.
Once the contactless signature is accepted and sent, the signature is applied to the customer signature field of the Checkout page.
Contactless signature options in the Checkout page in App Settings specify how to handle signatures received after the technician completes a checkout. They can be managed individually, or you can automatically attach an updated work order report to the work order in the back office.
- Process the contactless signature by QR code or by a link.
- Expand the Emails section.

-
Select the Wait to Email Customer until Final Appointment is Completed option if you want to email the customer after the final appointment on the work order is complete rather than as each appointment is completed. When you mark this option the Create and Attach Each Appointment Report in Back Office becomes enabled.
Mark the Create and Attach Each Appointment Report in Back Office option if you want the tech to receive an email of the invoice, if the Self option is marked. The customer will not be emailed if it’s not the final appointment regardless of the options to do so. If customer emails are marked, they will be ignored. Forms are also emailed with the final appointment (unless otherwise specified in the Form Options window). Whichever report is selected for the appointment summary will be created and attached with the appointment information in Signature.
Select the Include Task Summary Report option to include that report if there were tasks completed on the call. When marked, a Task Summary Report is emailed to the same recipients as the work order summary and form reports.
If forms are completed as part of this work order, the default report for each form will be sent in the email.
There may be form reports that are set up so to be withheld from the email to a customer. For example, internal Good Work forms or expense claims that the customer doesn’t need at this stage. Be sure to include yourself in the email at checkout so that you receive a copy of all submitted form reports.
- If you’re satisfied with everything on the appointment and the Checkout workspace, click Submit. This results in the following:
- The information from the appointment syncs and sends information from the appointment to the back office.
- The email for the report is sent to the recipients entered in step 9.
- The form reports (if any) are included in the email and attached to the work order in the back office.
- The appointment status changes to Complete.
If all information was sent, you’ll receive a message that the submission was successful. If your device happens to be offline when you click Submit, you should not enter any additional information for this appointment. Once you have a connection, you may need to sync again for the information to be submitted.
Note: If the Allow Parts and Time Entry on Completed Appointments toggle is on , additional time and parts can be entered for a completed appointment and will appear in the Past Appointments section of the Appointments home page until the work order is closed in the back-office application. After entering time or parts on a completed appointment, you’ll need to use the Checkout workspace to submit the information. You’ll be able to see only the resolution note and signatures for completed appointments.