![OmniByte - PNG Black Logo Oct 2021 (1).png]](https://help.omnibyte.com/hs-fs/hubfs/OmniByte%20-%20PNG%20Black%20Logo%20Oct%202021%20(1).png?height=50&name=OmniByte%20-%20PNG%20Black%20Logo%20Oct%202021%20(1).png)
Data mapping is how you connect information from a form (like names, dates, or files) to another system — such as a database or an external application. It helps you control what data gets sent where when a form is submitted.
A file storage data map allows you to store things like attachments, images, and related data in a specific location. This is useful if you want to save files submitted through a form to another system.
- Open the form for which you want to create a data map.
- Click on
 (Connect), then choose Data Maps to open the Data Maps page.
 - Click + Add to open the Data Mapping window.

- Choose File Storage as the data map type.
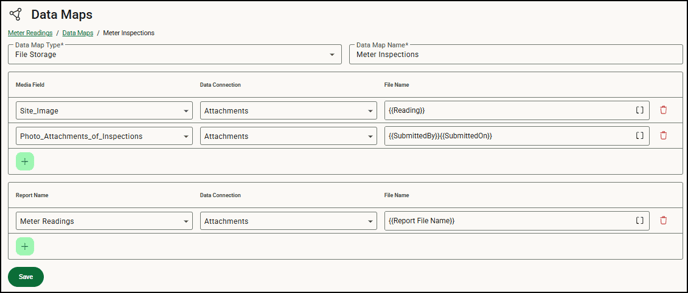
- In the Data Map Name field, enter a name for your data map. This is the name for the set of information you’re mapping. Because you can create multiple maps for each form, use a name that helps you identify the information in the map.
- Select the appropriate media field(s) and data connection. If needed, insert any merge fields to include in the data map.
- Select the report name and confirm the data connection.
- Click Save to save the data map information.
- Your map is set up. When forms are submitted, you should see data from the form appearing in the integrating application.
- View the Data Maps Log to ensure the data map ran successfully. We recommend that you specify an email to send the Data Map event error log reports to ensure the right personnel is aware of the errors and failures.