![OmniByte - PNG Black Logo Oct 2021 (1).png]](https://help.omnibyte.com/hs-fs/hubfs/OmniByte%20-%20PNG%20Black%20Logo%20Oct%202021%20(1).png?height=50&name=OmniByte%20-%20PNG%20Black%20Logo%20Oct%202021%20(1).png)
Use the Single Sign-On Settings tab to configure the connection between FormsPro and your Azure Active Directory (Azure AD) environment. This integration enables users to authenticate through Azure AD using Single Sign-On (SSO), providing a streamlined login experience and centralized user management.
Before you begin, ensure that you have completed the Azure AD application registration and have recorded the Client Secret Value and Secret ID generated during the process. These credentials are required to authenticate FormsPro with Azure AD.
For detailed instructions on creating and configuring the Azure AD application registration, see Integrating with Azure AD.
- Take note of the Value and Secret ID keys from the app registration you created.

- Navigate to your instance.
- From the Configuration menu, click Security Settings to open the Security page. Click Single Sign-On.
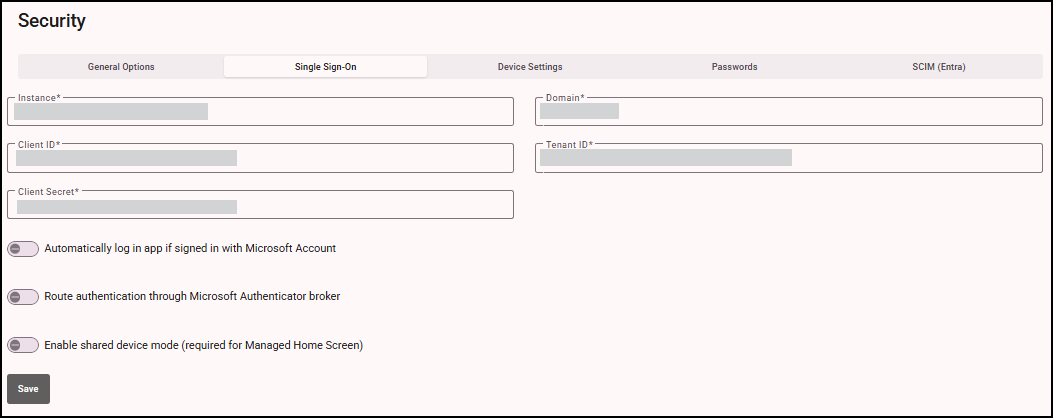
- Verify the configuration information:
- Instance: Indicates the Azure AD instance you are authenticating against, such as https://login.microsoftonline.com.
- Domain: This is your domain that authenticates the credentials and validates the user.
- Client ID: Issued to the client during the application registration process. This is the client ID or application ID from the app registration.
- Tenant ID: Digital identity from your Azure instance. This value specifies the Azure environment that will authenticate users.
- Client Secret: Issued to the client during the application registration process. Enter the Value of the client secret, not the Secret ID.
- Toggle Automatically log in app if signed in with Microsoft Account on if you are already signed in with your Microsoft account to automatically log in.
- Toggle Route authentication through Microsoft Authenticator broker on to allow authenticator to manage our access tokens.
- Toggle Enable shared device mode (required for Managed Home Screen) on to allow once a person logs off the device all information about that user will be deleted.
- Click Save to save your changes.
Once the Single Sign-On Settings are configured, you can sync and manage your users.