.png?height=120&name=OmniByte%20-%20PNG%20Black%20Logo%20Oct%202021%20(1).png)
How to make a table cell both required and enabled
Cell conditions can be created for a table so that the cell is enabled, required, or read-only. For more information on enabling cells, see Enabling a table cell.
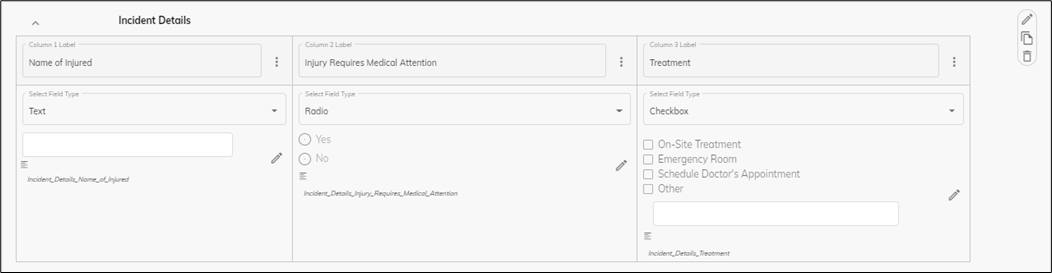
There may be instances when you need a table cell both required and enabled. For example, let's say you have an Injury Log that has a dynamic table for the incident details, where if the injury requires medical attention, the treatment needed is required information. However, if the injury doesn't require treatment, no additional information is required. Therefore, in the following dynamic table, the Treatment column needs to be both required and enabled in certain conditions.
To make a cell both required and enabled, complete the following:
- Click
 next to the input that you need to make required and enabled (in this example, the checkbox options in the Treatment column) to open the Edit pop-up window (in this example, the Edit Checkbox window).
 - Mark the Required option for the input.

- Then click Cell Condition to create a condition that enables the cell in certain conditions.

- Using the Injury Log example, from the Conditional applies to field, select Enabling Cell. Then add the conditional rule by clicking +. Select Incident_Details_Injury_Requires_Medical_Attention as the Field and is equal to as the Operator, then Yes as the value.
- Click OK to close the Edit pop-up window.
- Back in the Form Designer, notice the Treatment column of the dynamic table now has an asterisk in it to signify that it is required.

- Click
 to save the form.
 - Now on your device, when you answer Yes in the Injury Requires Medical Attention column, The Treatment column is both enabled and required.
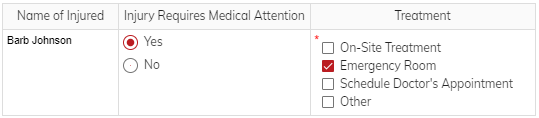
- Whereas, if you answer No in the Injury Requires Medical Attention column, the Treatment column is grayed out (disabled) and not required.
