.png?height=120&name=OmniByte%20-%20PNG%20Black%20Logo%20Oct%202021%20(1).png)
How to validate forms
You may have fields on a form that must meet certain requirements to submit. For example, let's say have a date field that must be equal to today’s date. Or you may need set up validations on minimum and/or maximum rows in a dynamic table. When a requirement isn’t met the form cannot be submitted. You need to make corrections first.
Validations can only be set up on advanced forms. You can set up an unlimited number of validations. They can be set up for any input that requires an entry on behalf of the user, except the following formatting types and inputs:
- Auto-Incrementing Number
- Conditional Field – Fields in a condition can be validated but must be shown to be validated.
- Embedded Image
- GPS Coordinates
- Header
- Link
- Lock
- Media
- Page Break
- Paragraph
- Section
- Signature
- Sketchpad
To set up form validations:
- From the Form Default Settings window, click Form Validations to open the Form Validations tab.

- Click the Input Validations + button to add an input validation.

- Select the field to apply the validation to, the operator, value type and value for the field. You can add as many validations as needed. Only Date, Date/Time Stamp, and Time inputs use the Value Type field. Value types are used to choose a value or another field to compare.
- In the Alert when not met field, enter a message to appear when the validation is not met. These messages are not translated. Be sure to write the message in the language you need it to appear. We recommend being specific when writing an alert message so that users know what they need to correct for a form to be submitted. For example, the following alert explains why the form cannot be submitted and the name of the field that must be corrected: “The form cannot be submitted. The Date field must be equal to today’s date.” Whereas “Form cannot be submitted” doesn’t provide any details and how to resolve the issue.
- Click the Table Row Validations + button to specify a minimum and maximum number of rows for a table.
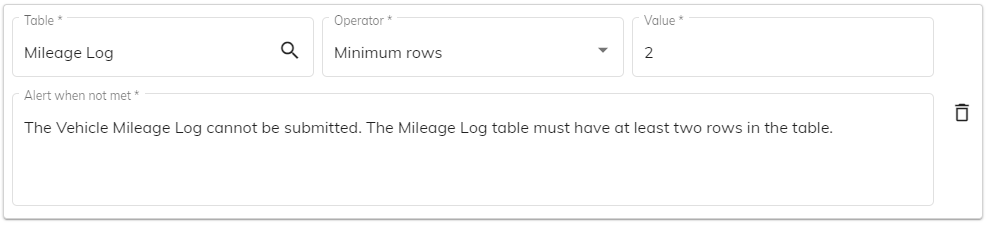
- Select the table to apply the validation to, the operator, and value for the table.
- In the Alert when not met field, enter a message to appear when the validation is not met.
- Click OK to save your entries, the click
 (Save) to save the form.
 - In the app, when you submit a form that doesn't meet the specified requirements, a Form Validation message appears. Click OK. The form will be saved in the Saved/received forms folder. Correct the issues and submit the form again.
