.png?height=120&name=OmniByte%20-%20PNG%20Black%20Logo%20Oct%202021%20(1).png)
How to use the Time Span field
Use a Time Span field to calculate the hours between two-time fields on a form. Once calculated, a time span field works like any other number field and can be used in other calculated fields. Time spans always display 2 decimal places.
Time span fields ensure accurate time tracking, simplifies calculations and avoids ambiguity in time data. In addition, time span fields help track time-sensitive data for legal or internal compliance.
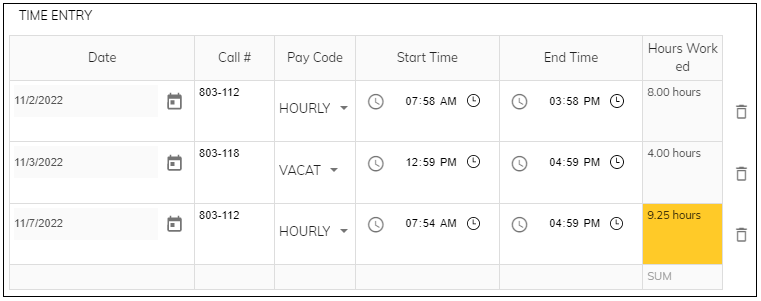
Let's say you have an employee timesheet where an employee enters the date they worked, call number worked on, pay code assigned to them and the start and end time of their workday. You want to easily calculate the hours they spent working each day. The following describes how to use a Time Span field in a dynamic table to calculate the hours worked each day:
- In the Form Designer, add a dynamic table to the form and add six columns: Date, Call #, Pay Code, Start Time, End Time, and Hours Worked.
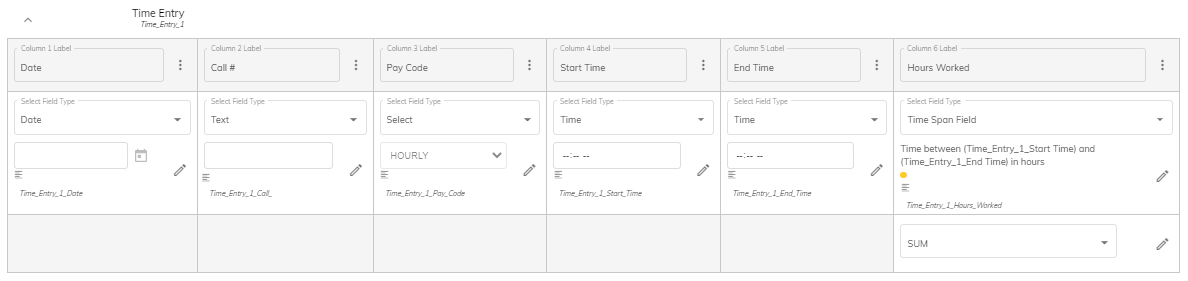
- Assign the appropriate field types to each column:
Date field = Date
Call # = Text
Pay Code = Select (add options for the pay code, such as Hourly, Overtime, Sick, Vacation)
Start Time = Time
End Time = Time
Hours Worked = Time Span Field - In the Hours Worked column, click
 (Edit) for the Time Span field to open the Edit Time Span Field window.
 - Select a starting time (Time_Entry_1_Start Time in this example) and ending time (Time_Entry_1_End_Time in this example) from the time fields that have been added to the form.
- Select how you want the resulting calculation to be rounded, if at all.

*Standard rounding uses the halfway point for the Round to Nearest selection to determine rounding up or down. Exactly half will round up.
NOTE: Timesheets for hourly employees in the U.S. have regulations for how time is rounded. If you are using a time span field for calculating hourly time, please be aware of the regulations when selecting your rounding options.
-
If you want, add rules to color format the data entered in the app to Number fields (including calculations and numbers in tables). In this timesheet example, if the hours worked exceeds 8, the field appears yellow in the app to signify more hours were worked than a typical workday.
- Click OK to close the window.
- Click
 (Save) to save the changes you've made to the form.
 - Publish the form and assign a role.
- Now when you enter information into this timesheet form on your device, you can see how the hours worked was calculated. Notice in the following illustration how the third row of the Hours Worked column is colored yellow to signify it is over 8 hours.