![OmniByte - PNG Black Logo Oct 2021 (1).png]](https://help.omnibyte.com/hs-fs/hubfs/OmniByte%20-%20PNG%20Black%20Logo%20Oct%202021%20(1).png?height=50&name=OmniByte%20-%20PNG%20Black%20Logo%20Oct%202021%20(1).png)
Use the Report Settings page to set up reports, configure report connections and conditional report settings.
Defining Report Settings:
Use the Report Settings tab to define report connections and network configurations.
- From the menu on the left, click Report Settings, then click the Report Settings tab.

- Toggle on the Do Not Use TechPro or SSRS Reports (FormsPro Reports Are Not Excluded by This Association) to only use FormsPro reports that are attached at checkout. When this option is toggled on, all report selections at the bottom of the page are disabled.
- Enter the SQL Server that contains the SSRS database. Then enter the username and password. This information is used to query the database to retrieve a list of available report folders.
- Enter the username and password for the user that has access to run the reports. The domain user needs Content Manager permissions granted for each report.
- Click Browse to open the Select SSRS Report Path window and select the report folder path where the reports are located.
- Toggle on each report you want to use from TechPro and select the appropriate SSRS report from the list. If you select a report that is not a TechPro or OmniByte custom report, the report will not run unless it has the work order or tech ID parameters necessary to do so. Contact support@omnibyte.com if you need assistance with the custom reports.
If a report is not toggled on, that indicates you have no need for this type of report and no report will be used for that type of work order.
When the Work Order Summary: Job option is toggled on all job work orders will have this report emailed to the recipients selected.
- Click Save. The reports will be printed and emailed when the conditions are met at checkout.
Defining Conditional Report Settings:
Use the Conditional Report Settings tab to create a user-defined field query, then retrieve the fields to create a condition for a specific report. When checking out an appointment, the conditional report is printed and emailed when those conditions are met. If you add a conditional report, the standard Work Order Summary Report will not print.
- From the menu on the left, click Report Settings, then click the Conditional Report Settings tab.
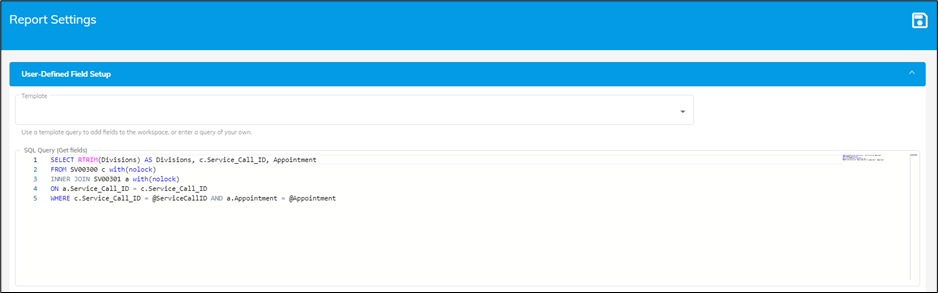
- Select a template query to help you compose a similar query or compose a query to get the fields you want to use for the report, and edit the template as needed. When composing your query, include key fields from the SV00300 table to retrieve the appointment fields.
TIPS: Include ‘WITH (NOLOCK)’ after all tables in your query. By default, in SQL, retrieving data reads only committed data, so the query must wait for data that is being written until it can return. When you use WITH (NOLOCK), this tells it to get data regardless of any other queries that are modifying it. This helps prevent deadlocks and uses less memory; however, it is possible to get a "dirty read," which means that you may read data that is being altered. You also may need to add an RTRIM function in the Select statement to remove trailing spaces from the string.
- Click Get Field Names/ Refresh. This retrieves the fields from the query and lists them in the Field Names list. Click this button every time you modify the query to refresh the Fields Name list.
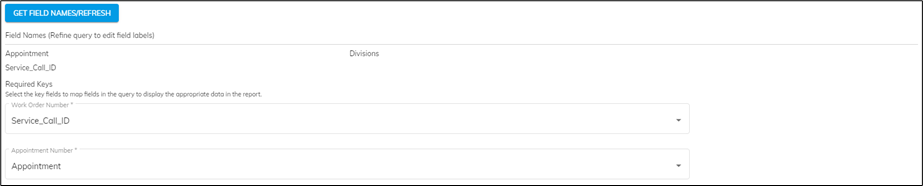
- Use the Required Keys field to map fields in the query to display the appropriate data in the report.
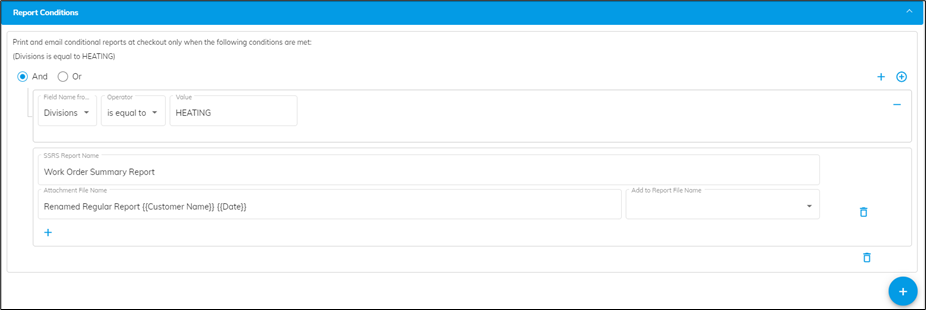
- Create a condition to retrieve a field from the query and associate the value from which a report will be based.
- Click Save. The report is printed and emailed when the conditions are met at checkout.