![OmniByte - PNG Black Logo Oct 2021 (1).png]](https://help.omnibyte.com/hs-fs/hubfs/OmniByte%20-%20PNG%20Black%20Logo%20Oct%202021%20(1).png?height=50&name=OmniByte%20-%20PNG%20Black%20Logo%20Oct%202021%20(1).png)
This workspace allows you to get a purchase order (PO) number and enter a purchase order as you’re at the vendor getting parts for the appointment, rather than using parts from assigned inventory sites. There is no need to call the office to get the number or wait to enter the information until later.
If the Allow Technician to Send Complete Purchase Order Prior to Checkout option is toggled on in the admin site, a Review and Send button is added to the Purchase Orders workspace so an app user can send completed purchase orders to the back office prior to checkout.
Note: If you don’t have a Wi-Fi or data connection, you can’t get the PO number. If traveling to a vendor that you know doesn’t have a good connection, get the PO number before you leave the office.
- Click the floating Add button.
- Select the vendor you’ll be purchasing from. Only approved vendors will appear in the list. When the Allow Deletion of Purchase Orders from App option is toggled on, a Delete button is enabled on the Purchase Orders workspace that allows you to delete the purchase order.
- Click Get PO Number. A PO number will be retrieved from the back-office system and appear in the field. It may take a few seconds.

- Once you have the PO number, click Add New Item. Then enter or select an item number.
You can use the lookup button to select items. You will need to select a filter and click Done, or search by typing a few letters then click the lookup button at the end of the Search bar to begin the search. You can also select filters, then search on the results to further limit the number of items to select.
Note: A non-inventory item can be entered by typing in an item number that does not exist in the system.
If the All Purchase Orders use Only Non-Inventory Items option is toggled on in the admin site, the Item lookup in the Purchase Orders workspace is removed. - Enter the unit of measure you’re purchasing the item in and then the quantity. (If the item is a serialized item, you’ll be able to enter only one item at a time so that the serial number can be recorded.)
- The unit cost will appear based on the U of M for the item, if the item is from inventory and can be changed. For a non-inventory item, enter a unit cost if one does not default for you. The extended cost will be calculated based on the quantity and unit cost.
- The description will appear for inventory items. For a non-inventory item, enter a description if the item number does not appear as a default.
- If the item is a serialized item, enter the serial number.
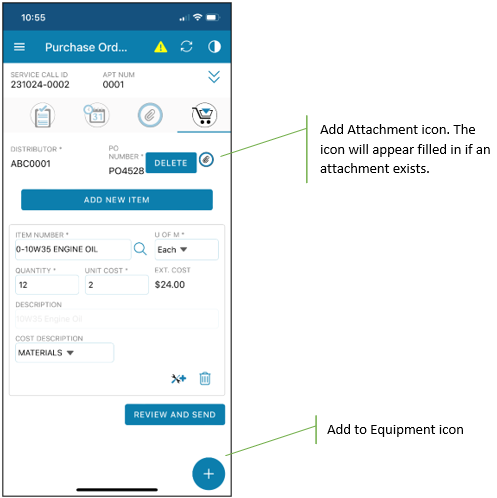
- For items that will be tracked as equipment at the location, you can click the Add to Equipment icon. This will add the record to the Equipment workspace. Additional information tracked for equipment can be entered in that workspace, such as manufacturer and model number.
- Additional items for this vendor and PO can be added by clicking the Add More Items button. Items you enter can be deleted using the delete button.
- Click the Add Attachment icon to attach a photo or image to the PO, for example, if you need to attach the receipt to the PO. This will open the Purchase Order Attachments window. Click the floating Add button and take a photo or select one from your gallery. This workspace works very similarly to the Attachments workspace, if you need additional details click this link. Enter a caption and click Done.
You can add another purchase order by clicking the floating Add button again and repeating the steps above.
Once a PO number has been retrieved, you can't delete it. A purchase order with no line items will be voided in the back office when you check out.