Using the Manage Report Window
How to use the Manage Report Window
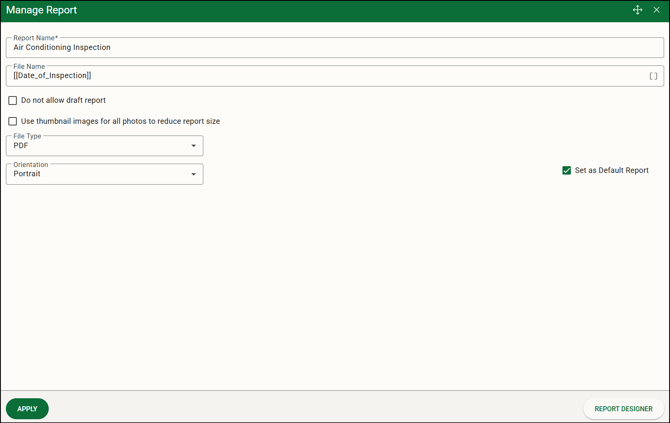
Use the Manage Report window to specify options on an advanced report. The form name appears as a default in the Report Name field. You can change this to be more descriptive of the information on the report.
- On the toolbar, click
 (Reports) then click
  next to the report name. The Manage Report window opens.
- Enter a file name for the report. This name identifies the report on email attachments and downloads. If you leave this blank, the form name is used instead. Click
 to select fields from your form which inserts the entries from the submission at the end of the file name for help in identifying the report. For example, you might have an inspection form that has a date of inspection field on it. By selecting this date to add to the file name, when you email or download the report this inspection date is part of the file name:
- Mark the Do not allow draft report option if you do not want app users the option to print a preview of the advanced report. When this option is marked, and an app user clicks the Draft Report icon, the following appears:

- Mark the Use thumbnail images for all photos to reduce report size option to show images as thumbnails on the report. We recommend you mark this option. This is helpful if your report has numerous images and takes a long time to open.
- Select a file type for the report. Reports can be saved as PDF, XLS, XLSX, CSV, or DOCX files. Each type is saved on a per-report basis and cannot be changed at the time of submitting. For example, if you have a report for which you need to export data out of a CSV file, you’ll create a report specifically using that file type. If, for the same form, you want an attractive report to send to customers, you would create a second report using a PDF file type. Mobile app users won’t be able to choose to send the report saved as a CSV file as a PDF when the form is submitted. If you have a form that needs a DOCX file attached or emailed, you can create an additional report as a copy.
If you choose a type other than PDF, you will need to design your report with the output in mind. For example, reports created specifically for exporting purposes (CSV or Excel files) should be designed as one table of information. Keep header information in line with the columns of form data if that information needs to be included. If header information is formatted separately and outside of the main table of data, the data may not export from the file appropriately.
If you want to print a multi-sheet Excel report, save the report as an XLSX file type. - Select the page orientation for the report. The Report Designer opens using that orientation for the report and all sub-reports on it. If you change the orientation after formatting the report, remember to go back into the designer to be sure your information and tables are lined up on the page. The data on the report is not moved if you change the orientation after saving.
-
Mark Set as Default Report to make this report the default report. The default report appears first in the Report menu and is indicated with the default icon.
- Click Apply, then click Report Designer. The report will build and open in the Report Designer. Modify the fields on your report to match the layout you're looking for.
- Click Save and then Exit to return to the Form Designer.
![OmniByte - PNG Black Logo Oct 2021 (1).png]](https://help.omnibyte.com/hs-fs/hubfs/OmniByte%20-%20PNG%20Black%20Logo%20Oct%202021%20(1).png?height=50&name=OmniByte%20-%20PNG%20Black%20Logo%20Oct%202021%20(1).png)