![OmniByte - PNG Black Logo Oct 2021 (1).png]](https://help.omnibyte.com/hs-fs/hubfs/OmniByte%20-%20PNG%20Black%20Logo%20Oct%202021%20(1).png?height=50&name=OmniByte%20-%20PNG%20Black%20Logo%20Oct%202021%20(1).png)
Use the Message Templates page to customize the subject line and body of contactless signature emails. By personalizing the subject and content, you help ensure customers recognize the message as coming from your company and technicians—making it more likely they’ll open, trust, and complete the signature process.
Note: Message templates apply globally to all emails of that type and cannot be customized on a form-by-form basis.
- From the Configuration menu, click Message Templates to open the Message Templates page.
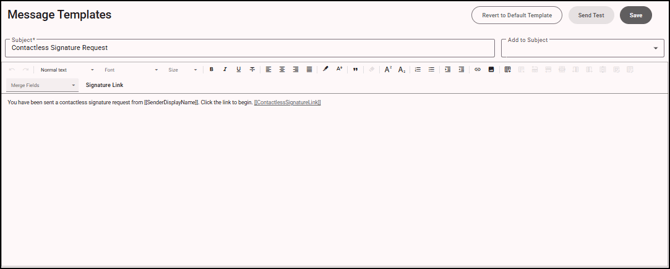
- Enter a custom subject line to appear in the recipient’s email inbox or use the default: Contactless Signature Request. You can include merge fields in the subject, such as Sender Display Name or Form Name. We also recommend including your company name for better recognition.
- Enter the message body text. Merge fields like Sender Display Name or Form Name can also be added here to personalize the content.
-
To enhance credibility, consider adding your company logo. Be sure to send a test email to confirm the logo displays correctly and is appropriately sized and positioned.
Finally, we recommend including a note at the end of the message to discourage replies or forwarding. For example:
“This is an unmonitored mailbox. This message is intended for the initial recipient. Please do not forward or reply to this message.”
-
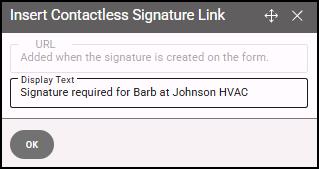
Click Signature Link to open the Insert Contactless Signature Link window. The URL is automatically generated when the signature is created on the form.
To display custom text instead of the full URL, enter your preferred wording in the Display Text field. Click OK, and the URL or display text will be inserted into the message body.
If you use custom display text, we recommend deleting the default ContactlessSignatureLink in the message body to avoid sending duplicate links.
- Click Save to save the message template.
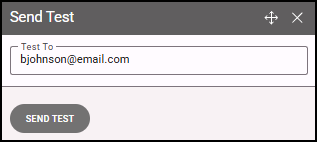
- Click Send Test to open the Send Test window, where you can enter an email address to receive a test message. If the test is sent successfully, you'll see a confirmation message, and the recipient will receive a sample email showing how the final message will appear.
- Click Revert to Default Template to reset all fields in the message template to their original default settings.