![OmniByte - PNG Black Logo Oct 2021 (1).png]](https://help.omnibyte.com/hs-fs/hubfs/OmniByte%20-%20PNG%20Black%20Logo%20Oct%202021%20(1).png?height=50&name=OmniByte%20-%20PNG%20Black%20Logo%20Oct%202021%20(1).png)
Sometimes, your form needs to pull in data from an external website or web service—such as a list of products, customer details, or live updates from another system. You can do this by creating a data set that uses an HTTP GET request.
An HTTP GET request is a method for retrieving data from a web server. It works by sending a specially formatted web address (URL) that tells the server exactly what information to return. When your form uses a data set configured this way, it automatically sends the request and receives the data—so users don’t have to enter it manually.
Think of it like searching on a website: when you type in a keyword and press enter, the URL behind the scenes includes your search term and tells the site what to display. An HTTP GET request does the same thing for your form.
This approach is especially useful when you're working with systems that don’t use traditional databases like SQL Server but still provide data through APIs or web services.
When creating a data set using HTTP GET, you include all the necessary details directly in the URL. This tells the system exactly what kind of data you’re requesting—whether it’s a full list, filtered search results, or a specific record.
This procedure outlines the basic steps for creating a data set using HTTP Get. For more detailed information about data sets, see Creating a Data Set.
- From the Reusable Components menu, select Data Sets. Click New Data Set. The Data Set Designer opens.
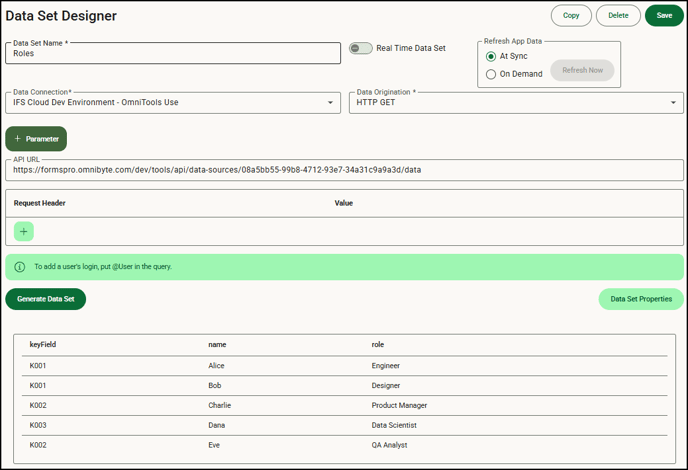
- From the Data Origination field, select HTTP GET. This tells the system that your data set will pull information from a web service by sending an HTTP GET request—a common method used to retrieve data from an API or online source.
- In the API URL field, enter the full web address (also called an endpoint) of the service you want to connect to. This is the URL that the system will use to request data. Make sure the URL is correctly formatted and includes any required parameters or query strings.
- If needed, click
 to enter a request header, which is additional information that needs to be sent along with the request. Request headers are often used to provide details such as the type of content being requested (such as JSON), authorization/API keys, or information about the client or app making the request. If you have also selected a data source, any headers you enter here will override those provided by the data source.
 - Click Generate Data Set to send the HTTP GET request to the URL you entered. The system will retrieve a response and display the data returned. If no data appears, double-check that the URL is correct and returns data when opened in a browser. You should also confirm that the web service you're connecting to supports HTTP GET requests.
- Click Save to save the data set. You can now begin using it in your forms. See Adding a Data Set to an Input and Adding a Data Set to a Dynamic Table for more information.