![OmniByte - PNG Black Logo Oct 2021 (1).png]](https://help.omnibyte.com/hs-fs/hubfs/OmniByte%20-%20PNG%20Black%20Logo%20Oct%202021%20(1).png?height=50&name=OmniByte%20-%20PNG%20Black%20Logo%20Oct%202021%20(1).png)
Use the Email Configuration page to configure email delivery through Microsoft Office 365. When configured, the application can send notifications, alerts, workflow messages, password reset emails, and other system-generated communications using your organization's Office 365 email services.
Integrating with Office 365 provides a secure and reliable method for sending email while leveraging your organization's existing Microsoft cloud infrastructure, security policies, and authentication controls.
Before configuring Office 365 email settings, you must first establish the required API access within your Microsoft environment. For more details, see Setting up API Access for Email through Office365.
The application uses Microsoft APIs to authenticate and send email on behalf of your organization. As a result, several configuration values must be obtained from your Microsoft Azure environment, including application registration details, tenant information, and authentication credentials
The Office 365 configuration process requires access to sensitive organizational information and administrative settings within Microsoft Azure. These values may include:
- Azure Tenant ID
- Application (Client) ID
- Client Secret
- API permissions
- Microsoft Entra ID (formerly Azure Active Directory) settings
- Mail service configuration details
Because these settings provide access to organizational resources and email services, it is strongly recommended that the configuration be completed by your organization's:
- IT department
- System administrator
- Microsoft 365 administrator
- Azure administrator
These individuals have the necessary permissions and expertise to safely retrieve and manage the required configuration values while ensuring compliance with organizational security policies.
Important: Do not share client secrets, access tokens, or other authentication credentials with unauthorized users. These values provide access to organizational resources and should be stored securely according to your organization's security standards.
Configuring the application to use Office 365 offers several advantages:
- Secure authentication through Microsoft identity services
- Integration with existing organizational email accounts
- Centralized management of email permissions and security policies
- Improved email reliability and deliverability
- Support for modern authentication methods
- Alignment with Microsoft security and compliance standards
After API access has been configured and the required Azure information has been obtained, you can enter the Office 365 configuration values on the Email Configuration page and test the connection to verify that email delivery is functioning correctly.
If you are unsure where to obtain any of the required values, contact your IT department or Microsoft 365 administrator before proceeding.
-
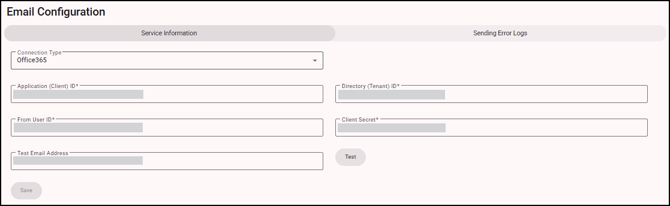
From the Configuration menu, click Email to open the Email Configuration page.
-
Select Office365 from the Connection Type drop down list.
-
To connect to Office 365 for email delivery, you’ll need to enter specific details from your Azure App Registration. These settings help authorize the connection securely and ensure your form application is allowed to send emails on behalf of your organization.
-
In the Application (Client) ID field, enter the unique identifier for the app you registered in Microsoft Azure Active Directory (Azure AD). This value is the application's identity within Microsoft's platform. When the application requests access to Microsoft 365 services, Microsoft uses the Application ID to determine which registered application is making the request
It helps Microsoft authenticate the application and verify that it has been granted the appropriate permissions to send email on behalf of your organization.
-
In the Directory (Tenant) ID field, enter the ID that "tells" Microsoft which organization the application belongs to and ensures that authentication requests are directed to the correct Microsoft 365 environment.
You can think of the tenant ID as your organization's unique identifier within Microsoft's cloud platform. Without it, the application would not know which Microsoft 365 tenant to connect to when requesting authentication or sending email.
-
In the From User ID field, specify the Microsoft 365 user account that will be used as the sender of emails generated by the application.
When emails are sent, this address appears in the From field of the email message, allowing recipients to identify the sender. In most cases, this is a dedicated mailbox or service account created specifically for application-generated communications.
The selected account must be authorized within Microsoft 365 and have the necessary permissions configured in Microsoft Entra ID and Exchange Online to send email on behalf of your organization. For example, notifications@company.com or forms@company.com.
-
In the Client Secret field, enter the secure credential generated during the application registration process in Microsoft Entra ID.
Similar to a password, the Client Secret is used together with the Application (Client) ID to authenticate the application and prove that requests are coming from a trusted and authorized source.
When the application connects to Microsoft 365, Microsoft validates the Client Secret before granting access to email services. If the Client Secret is invalid, expired, or missing, the application will not be able to authenticate successfully.
Important: The Client Secret is a sensitive security credential and should be treated like a password. It should only be accessible to authorized administrators and must be stored securely. Never share this value with unauthorized users or include it in publicly accessible documentation, emails, or source code repositories.
- In the Test Email Address field, enter a valid email address where you can receive a test message. Using your own email address is recommended so you can quickly verify that email delivery is functioning correctly.
- Click Test to send a test email using the configuration settings you entered. If the email is received successfully, the Office 365 settings have been configured correctly. If the test fails, review the credentials and settings before trying again.
- On the Sending Error Logs tab, click + (Add) to define who should be notified when errors or failures occur within the system. For more details, see Using the Email Configuration Page.
- Click Save to store the configuration settings. Once saved, the application will use these Office 365 settings to send all outgoing emails.